How to install a lintel


What is Lintel?
A lintel is a beam placed across the openings like doors, windows, etc. in buildings to support the load from the structure above. The width of the lintel beam is equal to the width of the wall, and the ends of it is built into the wall. Lintels are classified based on their material of construction. The lintels are found wherever it is necessary to support a wall etc. over an opening which is usually not more than about two meters wide. They provide support in completely different ways and an understanding of this is fundamental to selecting and assessing them.
There are many different shapes of lintels, determined by the properties of the material and the purpose for which the lintel is required. Architects and Structural Engineers regularly incorporate them into their designs. Stone and timber lintels are generally rectangular in cross-section. Concrete lintels are usually either rectangular, ‘L’ shaped (known as ‘boot’ lintels), or rectangular but with one vertical face sloping (used in cavity walls).
Types of Lintel used in Building Construction
Lintels are classified based on the material of construction as:
- Timber Lintel
In the olden days of construction, Timber lintels were mostly used. But nowadays they are replaced by several modern techniques, however, in hilly areas, these are using. The main disadvantages of timber are more cost and less durable and vulnerable to fire.
- Stone Lintel
These are the most common type, especially where the stone is abundantly available. The thickness of these are the most important factor in its design. These are also provided over the openings in brick walls. Stone lintel is provided in the form of either one single piece or more than one piece.
- Brick Lintel
These are used when the opening is less than 1m and lesser loads are acting. Its depth varies from 10 cm to 20 cm, depending upon the span. Bricks with frogs are more suitable than normal bricks because frogs when filled with mortar gives more shear resistance to end joints which is known as a joggled brick lintel.
- Reinforced Brick Lintel
These are used when loads are heavy and span is greater than 1m. The depth of reinforced brick lintel should be equal to 10cm or 15cm or multiple of 10cm. the bricks are so arranged that 2 to 3cm wide space is left lengthwise between adjacent bricks for the insertion of mild steel bars as reinforcement. 1:3 cement mortar is used to fill up the gaps.
- Steel Lintel
These are used when the superimposed loads are heavy and openings are large. These consist of channel sections or rolled steel joists and we can use one single section or in combinations depending upon the requirement.
- Reinforced Cement Concrete Lintel
At present, the lintel made of reinforced concrete is widely used to span the openings for doors, windows, etc. in a structure because of their strength, rigidity, fire resistance, and ease in construction.
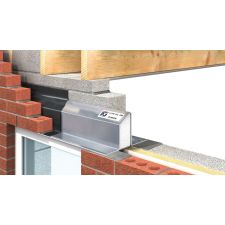
LINTEL INSTALLATION: ESSENTIAL TIPS
- Steel Lintels should be installed with a minimum end bearing of 150mm, bedded on mortar, and leveled along its length and across its width.
- The masonry above the lintel should be built in accordance with BS EN 1996-2:2006.
- Raise the inner and outer leaves simultaneously to avoid excessive eccentricity of loading, with a maximum height difference of 225mm (Masonry should be laid on a mortar bed and all perpendicular joints should be filled.)
- Allow the mortar to cure before applying floor or roof loads (Temporary propping beneath a steel lintel is practiced to facilitate speed of construction).
- The NHBC recommends a damp proof course (DPC) or cavity tray should be installed over all openings in external cavity walls.
- When installing concrete floor units or other heavy components above a lintel, care should be taken to avoid shock loading and floor units should not be dragged into position. Masonry immediately above the lintel should be allowed to cure.
- Point loads should not be applied directly onto lintel flanges. Steel Lintels should have a minimum of masonry 150mm high between the flange and the application level of any form of loading. Consult IG’s technical department if applying a point load above lintels.
- The external lintel flange must project beyond the window/door frame and it is recommended that a flexible sealing compound is used between the underside of the lintel flange and the frame.
- When the underside of a lintel is exposed, its appearance can be enhanced by the addition of lintel soffit cladding.
- Do not cut lintels to length or modify them in any way without consulting an engineer.
INSTALLATION TIPS FOR CONCRETE LINTELS:
- Recommended bearings are 100mm for openings of up to 1m, and 150mm for openings over 1m. The Minimum recommended lintel depth is 140mm in order to absorb the shock loading of a concrete floor. Precast flooring units should be laid on a mortar bed across the whole wall width and should not be dragged over supports.
INSTALLATION TIPS FOR STEEL LINTELS:
- Inner and outer leaves supported by the lintels should be raised together to avoid excessive eccentricity of loading. In the case of cavity walls, the cavity tray should extend not less than 50mm beyond the cavity return. The minimum recommended bearing length is 150mm.
- Composite lintels should be adequately propped during construction, at maximum centers of 1.2m. The props should not be removed until the mortar has cured.
- For the channel, lintels ensure that the inner leaf channel is filled with well-cured masonry before work proceeds over. Masonry needs to be built tightly against the vertical section of the channel and a mortar joint added to the top of the masonry so that the loads from units above are spread evenly over the inner flange of the lintel.
- For Rolled steel lintels a minimum bearing of 200mm is required and must be laterally restrained and adequately propped during construction at a maximum of 1.2-meter centers. For the timber frame, a tight-fitting timber batten should be placed at mid-span to help prevent any lateral deflection.
How are Lintels Introduced?
Many walls in your house will be what are called supporting walls. This clearly means they support something! This could be the walls for the rooms upstairs, the ceiling, or all the way up to the roof.
Lintels need to be inserted over every opening in a wall where the wall would be weakened by that opening. The principle is that by inserting a lintel, the weight above it is transferred to either side of it. This’s why a minimum of 150mm bearing must be allowed for the lintel to sit on the masonry on either side of the opening. Walls dimensions should be correct, and the lintel should be fully bedded on bricklaying mortar
When installing concrete floor units or other heavy components above a lintel, care should be taken to avoid shock loading and floor units should not be dragged into position. Masonry immediately above the lintel should be allowed to cure.
Ensure lintel is level along its length and position within a cavity wall.
The external lintel flange must project beyond the window/door frame and it is recommended that a flexible sealing compound is used between the underside of the lintel flange and the frame. All external wall lintels MUST be installed with a flexible damp proof course with exception of those adequately protected by an eaves overhang or similar form of protection.
Lintel should be centered in the cavity and the distance between lintel up-stand within the cavity and masonry must not exceed 10mm Masonry should not overhang any flange by more than 25mm.
October 14, 2020
|
Categories: ABC Depot Guide to Building Materials, ABC Depot Company News
| Tags: Plasterboard, Plywood, Insulation, Steel Lintels, Metal Stud Wall, Plasterboard Materials, Timber and Sheet Material, Building Materials Company, plywood sheets near me, sheet materials online
Related Products
-
 How to Choose the Correct Plywood June 6, 2017
 How to Choose a Structural Sawn Timber June 5, 2017
 How to Make a Metal Stud Wall June 19, 2017
 How to install a lintel October 14, 2020
 Why Choose A GRP Flat Roof ? February 24, 2020


Comments